Get Started
1. Installation
Open ‘Tools->Extensions and Updates’ inside Visual Studio(or 'Extensions->Manage Extensions' in VS 2019 or above). Then search for Netverest Tools on 'Online' tab. Install extension and restart visual studio. After reopening solution you have to wait for solution to load completely because this is required for Netverest tools to initialize correctly
2. Configure connection
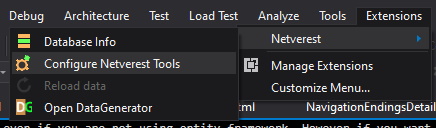 In VS there will be new menu 'Netverest'->‘Configure Netverest Tools’(In VS 2019 or above it will be withing 'Extensions' menu). You need to click on it and configuration modal window will pop up. Most of those steps has to be performed only once after installation of Netverest tools because configuration is saved per solution, so next time when you open this solution, everything will be set up for you and all data will be reloaded automatically. It can take from few seconds to one minute depending on number of classes in entity framework context and number of objects like tables, views and so on in your database.
Another advantage of this approach is that we only load and process data once, because database model is not changing that often, so after few initial moments everything is set up and there are no other heavy processes working in the background, so it won’t slow down your Visual Studio performance!
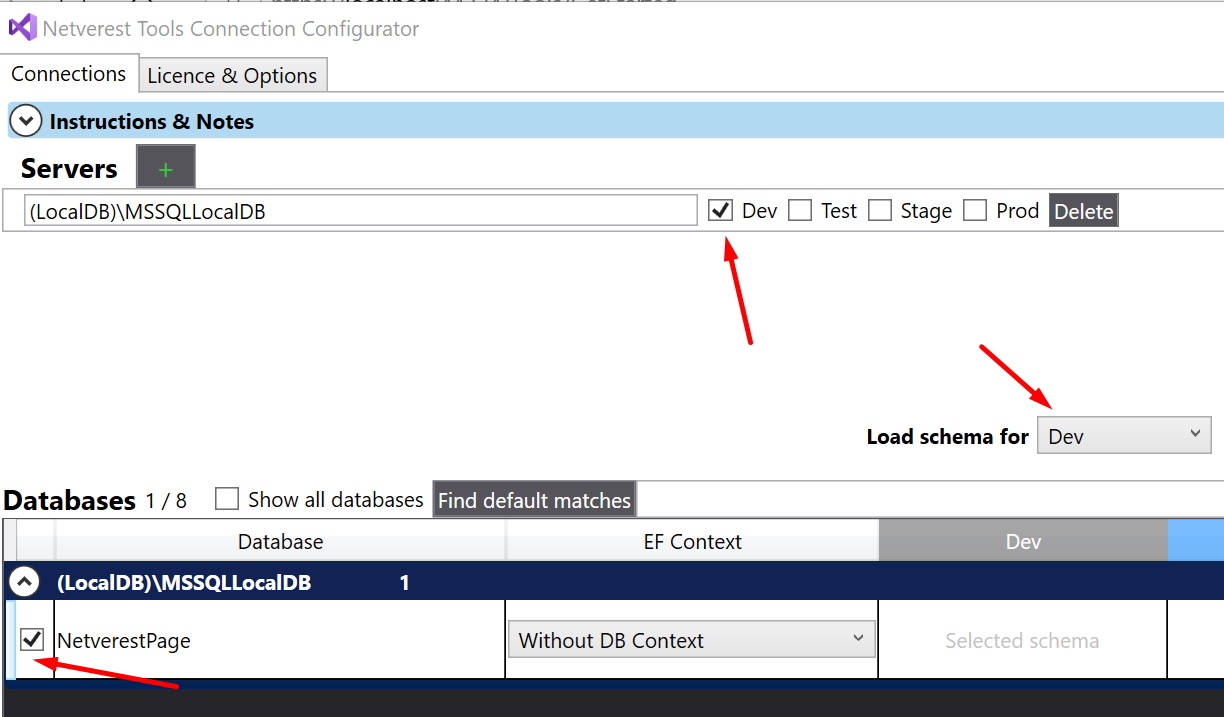 The most important part is connection string. First you need to provide server or servers, by pressing 'Add servers' button. It will open another modal with suggestions of connection strings found in solution but you can enter anything. You can select multiple servers if you are using few databases or environments and easily compare data between them(but you can also do it later). Close the modal and select environment for which all database informations will be loaded. By default it is Dev environment as it is changing the most frequent and developers often have admin rights there, which are recommended otherwise you can have issues with permissions when loading your db schema(production db should be better secured). Then you will need to select database on this server, but by default database from connection string is being selected and it might be enough.
That's it! It was that easy! You can click 'Save/Reload' and you will see if everything is OK. At this point you can start using Netverest Tools even if you are not using entity framework. However if you want to use entity framework mappings then please follow next section of this tutorial.
3. Configure Entity Framework
This step is optional, however it gives you amazing features allowing to work with your data directly from visual studio code editor and search tables by their class names. It is recommended to first check if all data has been correctly loaded without entity framework mappings, because this step is little bit more complicated due to fact that every project is completely different and it is difficult for me to test every possible scenario, but I will try to accomplish this.
This step is separated because it is good to know in case of error if it is related with this step or the previous one(especially if you are configuring this extension for the first time). To select dbContext you have to open 'Configuration' modal window again(from VS menu or DatabaseView). Then in 'EF Context' column of selected database you need to choose correct class of entity framework model for this database and save configuration.
This step is separated because it is good to know in case of error if it is related with this step or the previous one(especially if you are configuring this extension for the first time). To select dbContext you have to open 'Configuration' modal window again(from VS menu or DatabaseView). Then in 'EF Context' column of selected database you need to choose correct class of entity framework model for this database and save configuration.
After few seconds you will get following error message ‘Missing specialized DbContext constructor’, click ‘Details’ button and you will see similar code snippet. You can copy this snippet, then open your db context class and paste it there.

What is happening right now is very important to understand. Because reloading entity framework class mappings needs to create instance of your db context to extract those mappings, but I don’t want to create your ef context with default constructor, because there might be some logic or strategy to drop and recreate database etc. I don’t want to do any of this. Therefore you need to have constructor overload like the one in the snippet, so it can call this specific constructor with connection string from selected database and logic which you know is correct for this step. Please have in mind that provided snippet is only a hint of how it should look like, you may need to perform some changes to this code for example you might not be inheriting directly from entity framework db context but your own base class which don’t have constructor with string parameter. As you can see there is also a NOTE section which you might need to uncomment if you encounter a mentioned error.
After adding specialized constructor, we need to build our solution because we need new version of assembly with modified db context. This step is only required if we are using entity framework db context mappings. Now we can open configuration window again and reload data.
That’s it! As you can see all data has been loaded and you are ready to work with Netverest tools. It was very fast process, moreover you need to perform it only once per solution, so next time when you open solution everything will be already configured.
That’s it! As you can see all data has been loaded and you are ready to work with Netverest tools. It was very fast process, moreover you need to perform it only once per solution, so next time when you open solution everything will be already configured.
EF Core
This process is almost exactly the same, only difference is in how you define specialized construcor. In this case you need to derive from Ef Core model class and override method, which allows to provide custom connection string. You will get more details and example in error message, when reloading ef context without this constructor.
4. Troubleshooting
You are ready to start using Netverest tools and reach summits of productivity 😊 you will see how easy and fast is data querying.
If during configuration you had any other problems/issues which were not mentioned in this tutorial, please log an issue or bug on Community page and I will try to resolve them in future releases.
You can also open log.txt file to check what caused the problem. For DataGenerator Log folder is inside application folder, for NetverestTools Log folder is located in 'Users/{LoggedUser}/Netverest/Logs'
5. Other settings
On second tab of configuration window we have also other settings. Every option has tooltip with description, so it is easier to become familiar with those options. There are options like ‘Get counts’ which can be very useful however by default it is turn off because it performs count for every table in db, so in some cases when we have hundreds of tables it might not be the best option. Here we can also define ‘Convention matches’ which are amazing if you use this kind of architecture and missing foreign key analyser options.
6. Reload data
Sometimes model can be out of sync because our database or entity framework model has changed, to fix this problem you need to reloada data. It is always done when you are opening solution in visual studio, but you can also do it in any moment. Just open configuration window again and click 'Save/Reload', you don't need to change anything on this modal window. Or you can select 'Reload data' from menu. Please make sure that you've built your solution before reloading data if your EF model has changed, because this extension needs newest assembly with your dbContext to reflect those changes.
7. Hints & Goals
Goal of this extension is to speed up querying your data it won’t replace Sql server management studio for you, but it will greatly reduce time spent switching between VS and SSMS. For more advanced queries with subselects etc. you can create basic query in this extension then copy it to SSMS and work with it there.
Another thing is that this extension is not for creating custom queries in ‘Query’ field, this query will be overwritten on any change and this is correct behaviour.
Next hint is that when it comes to speed and productivity the best way of working with those tools is to use shortcuts, most often used shortcuts are ctrl+D+F and ctrl+D+S those shortcuts are extremely useful and if you don’t have them specified, then user experience will be much worse than it should be. Sometimes your shortcuts might not be assigned, especially if you have those shortcuts already specified, this might be the case if you have installed resharper. In this case you have to open ‘Tools->Options->Keyboard’ and search for ‘selecttop’ or ‘databaseinfo’ and assign correct shortcuts.
8. Requirements
Currently Netverest tools works only with Visual Studio 2015+ due to use of roslyn which was not available before this version, SQL server 2008+, Entity framework 5+ with code first, model first, db first approaches. It finally also works with EF Core!
.Net Framework 4.6
Recommended resolution is Full HD.
9. Licensing
It it completely FREE, no hidden costs, no monthly or yearly fees, no expiration date.
You can get 'Donor' licence, by donating this project. It will remove adds from it and allow you to vote on community page. Every licence key will be attached to your PC and will work as long you are using the same computer. To activate licence key, you will need to open configuration window and open second tab 'Options & Licence'.
This product is distributed 'as it is'.
10. Thank you
Thank you for your time, I hope Netverest tools will be useful for you and increase your productivity. If you like us please tell your friend about us and show Netverest tools in your workplace. Happy coding!